
The 0.4 mm nozzle supplied with many filament printers is not a compromise you have to escape from. It is a sensible middle ground: small enough for most everyday detail, wide enough to put down a useful amount of plastic, and supported by countless tested printer profiles. Changing it can help, but only when the job demands something different.
On this page
- Nozzle diameter is not layer height
- The four sizes most buyers encounter
- What changes when you fit a smaller nozzle?
- What changes when you fit a larger nozzle?
- Choosing a nozzle for PLA, PETG and flexible filament
- Why the nozzle material matters as much as its size
- Will a 0.6 mm nozzle print twice as fast?
- Does a larger nozzle make better bridges?
- A sensible way to decide before buying
- How we would test the sizes fairly
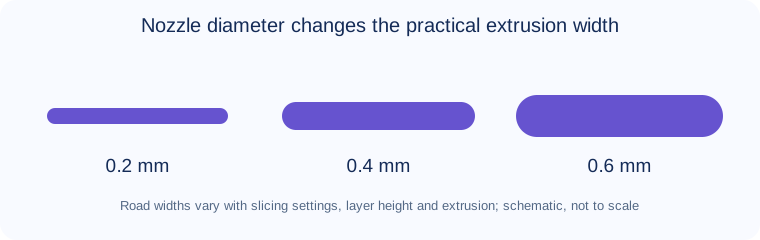
For miniature features and fine lettering, a smaller nozzle may reveal details that the standard one cannot form cleanly. For large functional pieces, thick walls or some filled materials, a 0.6 mm nozzle may be more practical. A 0.8 mm nozzle is a more deliberate trade: faster, broader extrusion at the cost of fine XY detail. Neither change is a universal upgrade.
Nozzle diameter is not layer height
The nozzle diameter is the nominal opening through which the molten filament exits. Layer height is the vertical increment between printed layers. Extrusion width is the width of the deposited line, controlled by the slicer and material flow. These are related, but they are not the same setting.
For example, a 0.4 mm nozzle may use a 0.45 mm extrusion width in a particular PrusaSlicer profile.[1] It can print at several layer heights without changing the nozzle. Lowering layer height reduces visible stair-stepping on sloped faces, but it does not magically enable the nozzle to draw every tiny horizontal feature. Prusa points out that layer height mainly changes vertical resolution; nozzle diameter also matters in the XY plane.[2]
The often-repeated practical ceiling of roughly 80% of nozzle diameter for layer height comes from Prusa's guidance. For a 0.4 mm nozzle that is around 0.32 mm, not a promise that every printer will print well at that height.[2] Your manufacturer's supported presets take precedence over generic numbers.
The four sizes most buyers encounter
| Nominal size | Best reason to consider it | Main compromise |
|---|---|---|
| 0.2–0.25 mm | Tiny lettering, intricate decorative detail, small features | Slow printing; easier clogging; limited with filled and flexible filaments |
| 0.4 mm | General prototypes, household parts, typical PLA/PETG models | Neither finest possible detail nor maximum material throughput |
| 0.6 mm | Stronger-looking wide lines, bulky practical parts, some filled materials | Small holes, sharp corners and thin lettering need more care |
| 0.8 mm | Large pieces, thick shells and coarse functional prints | Fine surfaces and miniature geometry become harder or impossible |
This is a choice framework, not measured speed, strength or surface-quality scores. Actual print time depends on how much plastic the hotend can melt per second, the printer's motion limits and the model. A bigger hole cannot overcome an underpowered heater or inadequate melt zone.
What changes when you fit a smaller nozzle?
Its narrower bead can reproduce smaller XY details: thin text strokes, miniature lattice features and intricate edges. In exchange, the slicer often needs more paths to fill the same wall or surface, increasing toolpath length and time. The smaller opening is also less forgiving of contamination and particles in decorative or reinforced filament.
The effect on layer lines is frequently misunderstood. A 0.2 mm nozzle does not force every print to use ultra-fine layers, and a 0.4 mm nozzle can still use small layer heights. The smaller nozzle is most worthwhile when the *geometry's lateral detail* justifies it. If the object is a plain rectangular box, printing it with an unnecessarily small nozzle may only make it slower.
Prusa's nozzle compatibility notes warn that some flexible filaments and filled materials are problematic with very small openings.[3] Before changing hardware to chase detail, consider model orientation, adaptive layer height and whether the detail is physically printable at the chosen scale.
What changes when you fit a larger nozzle?
A 0.6 or 0.8 mm opening supports wider extrusion lines and potentially thicker layers. For a large box, a vase or a garden fitting, that can reduce the number of passes needed to form a shell. Wider lines may also improve bonding in some circumstances, but nozzle diameter on its own does not guarantee a stronger part.
Strength depends on material, temperature, bonding between adjacent beads, orientation, wall count and design. A larger nozzle with the wrong flow settings can under-extrude badly. Large extrusions also mean more hot plastic to cool; overhangs, bridges and corners may deteriorate unless the print profile is adapted. Prusa explicitly notes the detail and cooling trade-offs of larger diameters.[3]
One further limitation is the hotend's volumetric flow capacity. A slicer command for a thick bead at very high speed may demand more molten plastic than the heater and melt zone can supply. Slowing down—or using an appropriate high-flow hotend—can matter more than a larger opening.
Choosing a nozzle for PLA, PETG and flexible filament
PLA: A standard 0.4 mm nozzle is a good starting point. Choose a smaller size for genuinely fine details or a larger one for broad, simple functional geometry. Do not swap size because a filament colour or marketing label promises better quality.
PETG: The normal 0.4 mm option works well for many grades. A larger nozzle can help with thick practical parts, but tune strings, cooling and support contacts independently. PETG's tendency to leave fine hairs is not primarily a nozzle-diameter problem.
TPU and other flexible grades: A small opening may demand more extrusion pressure, which is awkward for flexible filament. Prusa's compatibility table favours 0.4 mm or larger over 0.25 mm for flexible materials.[3] Direct-drive geometry, filament hardness and feed path also matter more than one nominal nozzle number.
Abrasive or particle-filled composites: Consider both the *opening size* and the *nozzle material*. Reinforcing fibres and decorative particles can clog a very small bore, while abrasive fillers can wear ordinary brass. Manufacturer guidance on minimum diameter and hardened materials is essential. The broad label "carbon-fibre filament" does not tell you the exact particle size of every formulation.
Why the nozzle material matters as much as its size
Brass is common for conventional, non-abrasive filament because it conducts heat well and is inexpensive to replace. Hardened steel and other wear-resistant constructions are often specified for carbon-, glass- or metal-filled materials. Their thermal behaviour differs, so a preset tuned for brass is not automatically correct after a material change in the nozzle itself.
Check the printer maker's compatible assembly, not merely a generic screw thread. Some printers accept a small removable threaded nozzle, while others use a proprietary nozzle/hotend unit. A part that looks similar in a listing might fit poorly, leak or damage the heater assembly. The settings and nozzles guide covers the broader tuning relationship.
Will a 0.6 mm nozzle print twice as fast?
Not reliably. A wider nozzle can deposit more material per path and sometimes lets a large, simple object finish sooner. But a fine-featured model might see little improvement: it still requires travel, small perimeters, cooling time and many vertical layers. In some cases the larger extrusion forces slower movement to remain within volumetric flow limits.
A useful way to compare is to slice the same actual model with two manufacturer-supported nozzle profiles and inspect the estimated time, material usage, thin features and previewed line width. Treat the displayed slicer time as a planning estimate, not an independent real-world benchmark.
Does a larger nozzle make better bridges?
Not necessarily. Bridges depend on material viscosity, cooling, span length, direction, flow and fan settings. A broader, heavier molten strand can sag more; a narrow strand may stretch or separate. The same is true of overhangs. Changing nozzle size should trigger a bridge and overhang profile check rather than assuming the new hardware will correct a geometry problem.
For tightly fitting parts, recheck hole sizes, external walls and clearances. A slicer cannot always preserve a feature that is smaller than the bead it plans to lay down. Prusa's design guidance gives an example in which 0.4 mm hardware uses 0.45 mm extrusion width and walls below a single perimeter are not printable as ordinary walls.[1]
A sensible way to decide before buying
- Name the problem. Is it small detail, excessive print time, wear from abrasive material or something else?
- Check the model. If the part has fine lettering or tiny slots, preview whether a 0.6–0.8 mm profile removes them.
- Check the filament. Follow its minimum nozzle diameter and wear-resistance instructions, particularly for filled grades.
- Check the printer. Confirm compatible nozzle or integrated hotend parts, heater capability and factory profiles.
- Compare the slicer output. Use the same model, material and quality target to compare estimates without pretending they are controlled physical tests.
- Retune and validate. A hardware change may require a new printer profile, first-layer setting, flow calibration and temperature check.
If you are happy with 0.4 mm output and have no specific problem to solve, keep it. The second nozzle worth considering for many practical users is 0.6 mm; the fine-detail option is a specialised choice for smaller features, and 0.8 mm is aimed at large, comparatively simple objects.
How we would test the sizes fairly
We would use one printer with approved matching hotends, the same material batch and several models: a small lettering sample, a dimensional box, a practical load-bearing bracket and a long bridge. We would document print time, extrusion width, measured dimensions, surface detail and defects, then repeat each setup. Material throughput would be checked against hotend capability, not inferred from nozzle diameter.
Those comparative print results have not been collected for this article. The recommendations above are based on printing mechanics and cited manufacturer documentation; they are not an invented nozzle shoot-out.
Sources
[1] Prusa — Modelling with 3D printing in mind
[2] Prusa — Layers and perimeters